Deploying a development environment
In this section we will learn how to run GeoNode in development mode; this particular way to run GeoNode will allow us to view and debug any change to the code at runtime, without the need to restart the services.
Notice that we will still need the following services to run on the system:
PostgreSQL service w/ PostGIS extensions; we will learn how to link Dev GeoNode to an existing database and how to initialize a new one.
Apache Tomcat9 with GeoServer; we will still need a running GeoServer instance to be able to manage the geospatial layers.
Stop GeoNode Services
You may have some services still running from a previous tutorial, so make sure such services are down.
Stop
NGINXandUWSGIservices
sudo systemctl stop nginx

sudo systemctl stop uwsgi
You may also want to check the status of the services:
sudo systemctl status nginx
   [...long output here...]

sudo systemctl status uwsgi
   [...long output here...]
You may also want to check that the service was properly closed
sudo ps aux | grep uwsgi
If you find any uwsgi process left, you can kill them right away:
sudo pkill -9 -f uwsgi
Other services and processes
In order to have a complete GeoNode ecosystem, you need some other services along with the GeoNode-django process itself.
As documented in a previous training, you will have to setup at least PostgreSQL and GeoServer. If you didn’t do it before, run
Prepare the GeoNode environment
You may have your GeoNode code already checked out, anyway let’s repeat here the steps of the “GeoNode Basic Install” training lesson.
Create the
geonodevirtualenv (if you don’t have it already):mkvirtualenv --python=$(which python3.8) geonode
Switch to
geonodevirtual envworkon geonode
Prepare the geonode working dir (if you don’t have it already):
# Let's create the GeoNode core base folder and clone it
sudo mkdir -p /opt/geonode/; sudo usermod -a -G www-data $USER; sudo chown -Rf $USER:www-data /opt/geonode/; sudo chmod -Rf 775 /opt/geonode/

# Clone the GeoNode source code on /opt/geonode
cd /opt; git clone https://github.com/GeoNode/geonode.git -b 3.3.x geonode
Install the Python packages needed by GeoNode:
cd /opt/geonode
pip install -r requirements.txt --upgrade --no-cache --no-cache-dir
pip install -e . --upgrade
pip install pygdal=="`gdal-config --version`.*"
Prepare the .env_dev variables
Adjust the .env_dev file in order to match our current configuration.
vim .env_dev
Make sure SITEURL, DB connection settings and GEOSERVER_* URLs and connection params are correct.
...
# #################
# backend
# #################
POSTGRES_USER=postgres
POSTGRES_PASSWORD=postgres
GEONODE_DATABASE=geonode
GEONODE_DATABASE_PASSWORD=geonode
GEONODE_GEODATABASE=geonode_data
GEONODE_GEODATABASE_PASSWORD=geonode
GEONODE_DATABASE_SCHEMA=public
GEONODE_GEODATABASE_SCHEMA=public
DATABASE_HOST=localhost
DATABASE_PORT=5432
DATABASE_URL=postgis://geonode:geonode@localhost:5432/geonode
GEODATABASE_URL=postgis://geonode:geonode@localhost:5432/geonode_data
GEONODE_DB_CONN_MAX_AGE=0
GEONODE_DB_CONN_TOUT=5
DEFAULT_BACKEND_DATASTORE=datastore
...
SITEURL=http://localhost:8000/
...
# #################
# geoserver
# #################
GEOSERVER_WEB_UI_LOCATION=http://localhost:8080/geoserver/
GEOSERVER_PUBLIC_LOCATION=http://localhost:8080/geoserver/
GEOSERVER_LOCATION=http://localhost:8080/geoserver/
GEOSERVER_ADMIN_USER=admin
GEOSERVER_ADMIN_PASSWORD=geoserver
Aligning the DB
Make sure the DB and GeoNode are aligned.
Align the migrations and static/media folders
./paver_dev.sh sync
Align the internal URLs and Metadata links
# The order is important! Those are regex expressions and will be executed one after the other...

# Fix GeoServer URLs first
./manage_dev.sh migrate_baseurl --source-address=http://localhost/geoserver --target-address=http://localhost:8080/geoserver

# Fix GeoNode URLs
./manage_dev.sh migrate_baseurl --source-address=http://localhost/ --target-address=http://localhost:8000/

# Align the Metadata links
./manage_dev.sh set_all_layers_metadata -d
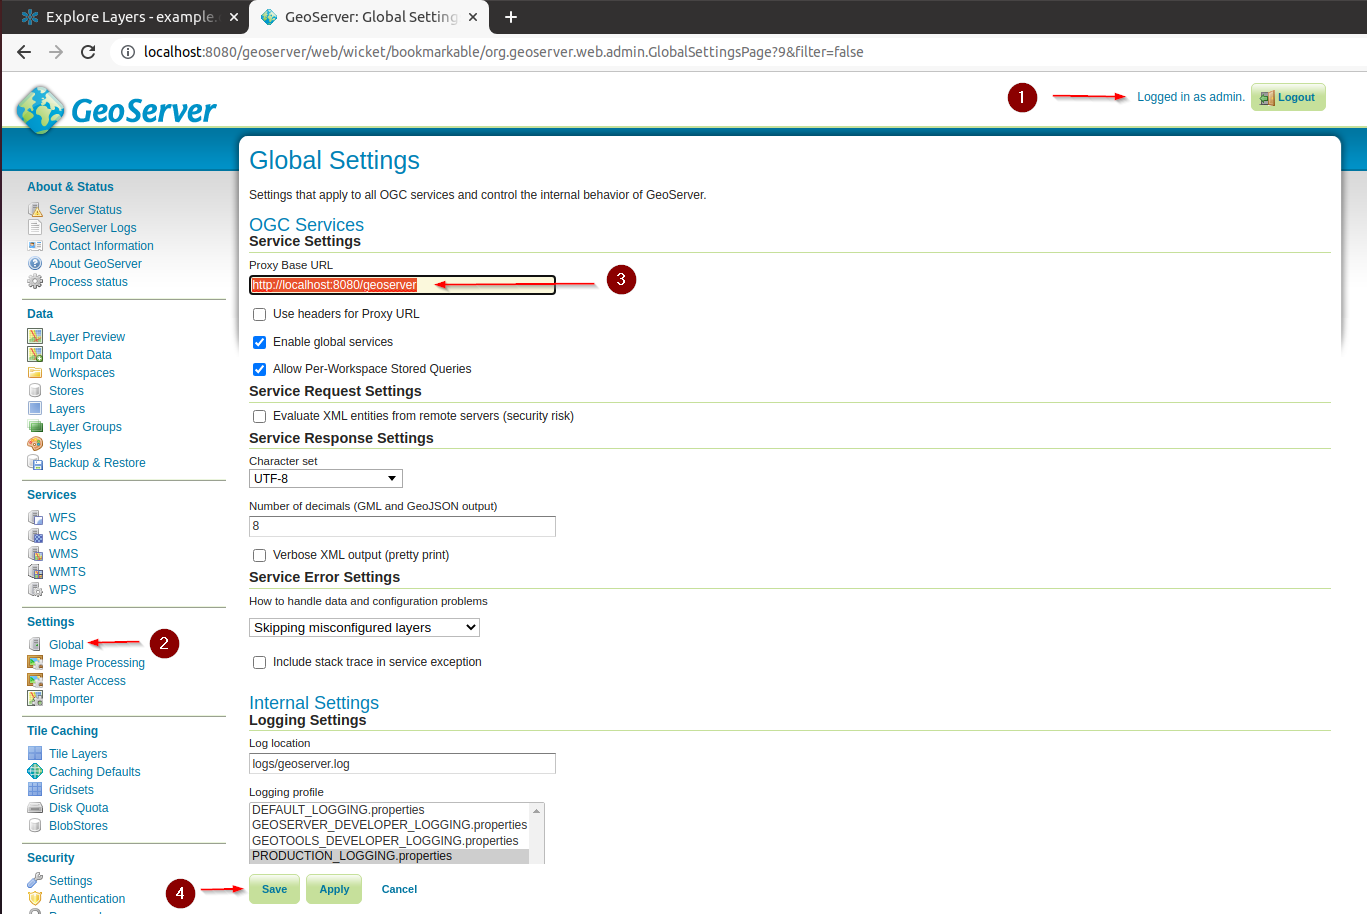
Configuring GeoServer OAuth plugin
Make sure the GeoServer OAuth plugin is correctly configured
Adjust the GeoServer
PROXY_BASE_URLLogin as
admin/geoserverby using theform loginUpdate the
Globalsettings of GeoServer
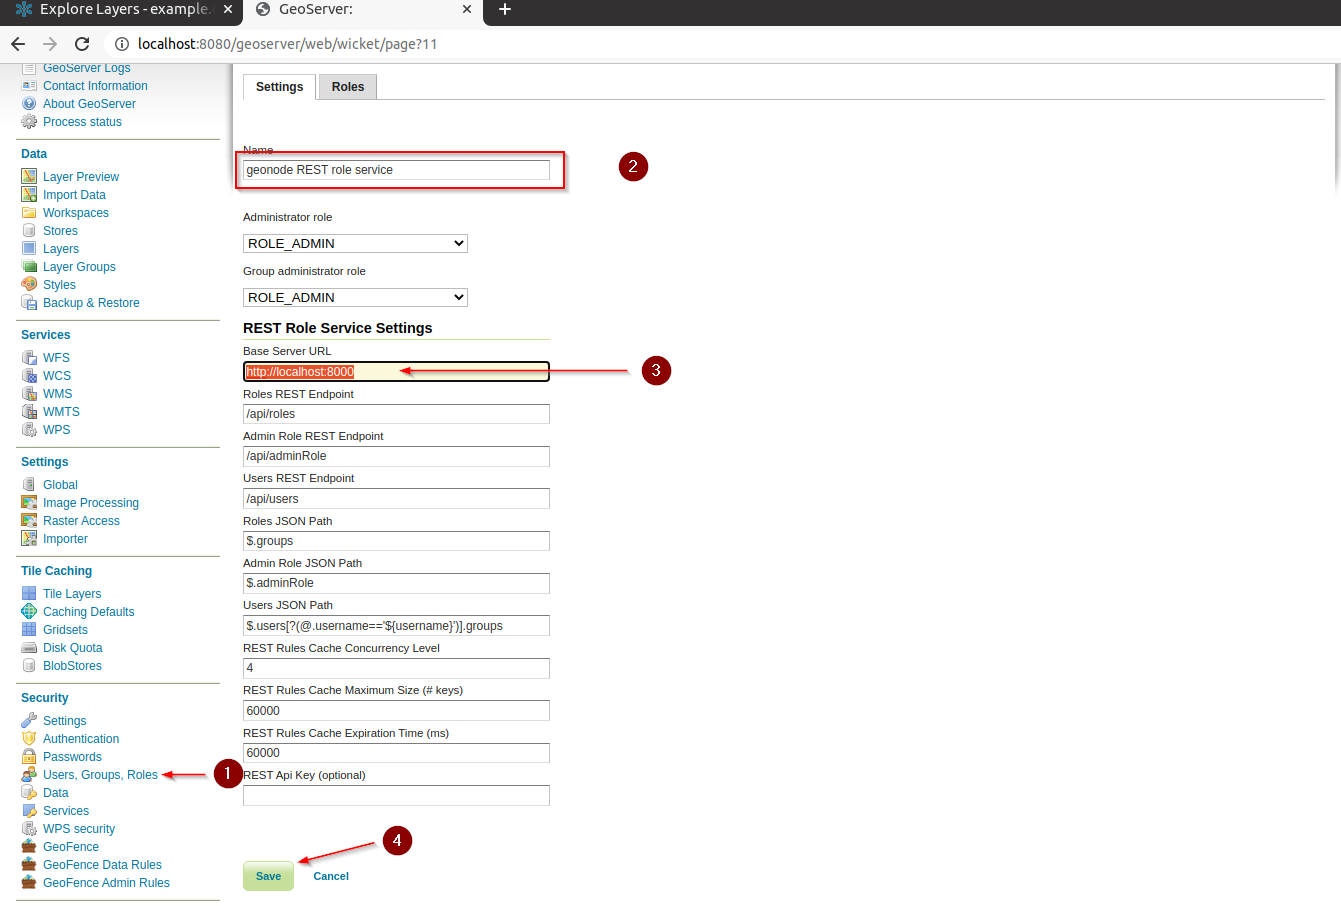
Adjust the
REST Role Service
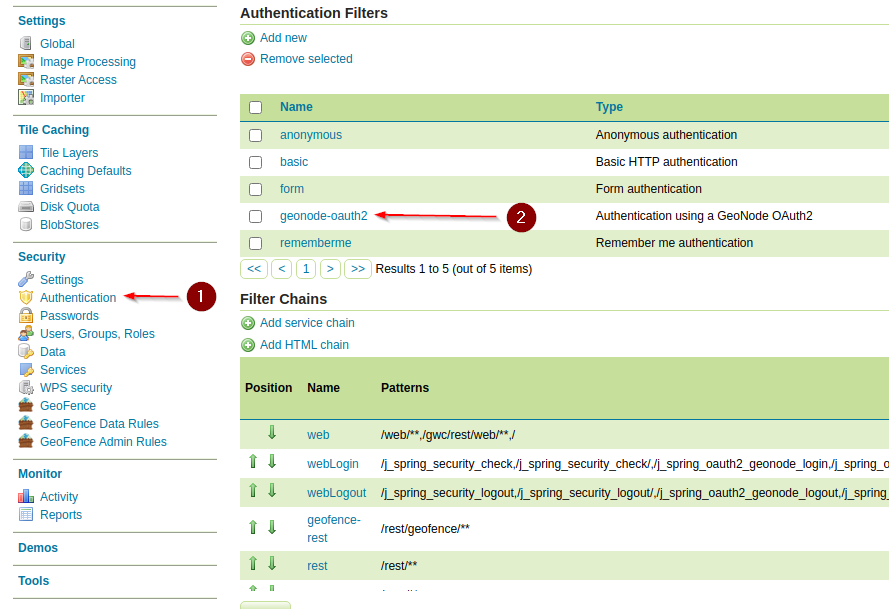
Adjust the
OAuth2 Security Filter

Test the GeoServer
logout/loginwith GeoNode
Let’s Start GeoNode
Let’s refresh the layers thumbnails and verify the settings are correct
./manage_dev.sh sync_geonode_layers --updatethumbnails

Syncing layer 1/11: a__13tde815295_200803_0x6000m_cl
Regenerating thumbnails...
Syncing layer 2/11: Air_Runways
Regenerating thumbnails...
Syncing layer 3/11: BoulderCityLimits
Regenerating thumbnails...
Syncing layer 4/11: Buildings050714
Regenerating thumbnails...
Syncing layer 5/11: Mainrd
Regenerating thumbnails...
Syncing layer 6/11: Parcels
Regenerating thumbnails...
Syncing layer 7/11: pointlm
Regenerating thumbnails...
Syncing layer 8/11: srtm_boulder
Regenerating thumbnails...
Syncing layer 9/11: Streets
Regenerating thumbnails...
Syncing layer 10/11: Trails
Regenerating thumbnails...
Syncing layer 11/11: Wetlands_regulatory_area
Regenerating thumbnails...
There are 0 layers which could not be updated because of errors
Start GeoNode in
development mode
./paver_dev.sh start_django

---> pavement.start_django
 python -W ignore manage.py runserver 0.0.0.0:8000 &
Performing system checks...

System check identified some issues:

WARNINGS:
?: (urls.W005) URL namespace 'rest_framework' isn't unique. You may not be able to reverse all URLs in this namespace

System check identified 1 issue (5 silenced).
September 07, 2021 - 16:07:13
Django version 2.2.20, using settings 'geonode.settings'
Starting development server at http://0.0.0.0:8000/
Quit the server with CONTROL-C.
Connect to
http://localhost:8000and verify GeoNode has started correctly